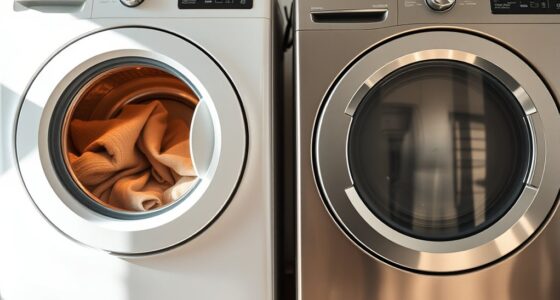
Welcome to our comprehensive guide on properly maintaining your commercial dishwasher.
At our team, we understand the importance of keeping your dishwasher in top-notch condition. Just like a well-oiled machine, your dishwasher needs regular care and attention to ensure it performs at its best.
In this guide, we will provide you with valuable tips and techniques to help you master the art of dishwasher maintenance. From cleaning the interior and inspecting the spray arms to checking and cleaning the filters, we’ve got you covered.
We’ll also walk you through checking the drain pump, tightening electrical connections, and testing water temperature. Additionally, we’ll address common issues and even guide you on scheduling professional maintenance services.

Let’s dive in and unlock the secrets to maintaining your professional dishwasher like a pro.
Key Takeaways
- Regular maintenance and cleaning of your professional dishwasher is essential to prevent mold growth, maintain optimal performance, and ensure longevity.
- Cleaning and inspecting components such as spray arms, filters, and door gaskets helps to prevent clogs and ensure effective cleaning.
- Troubleshooting common issues such as leaks, poor cleaning performance, power failures, temperature fluctuations, and clogs can be addressed through regular maintenance.
- Scheduling professional maintenance services with experienced and certified technicians is important to prolong the lifespan of your dishwasher, reduce the risk of breakdowns, and comply with health regulations.

Philips 2200 Series Fully Automatic Espresso Machine, Classic Milk Frother, 2 Coffee Varieties, Intuitive Touch Display, 100% Ceramic Grinder, AquaClean Filter, Aroma Seal, Black (EP2220/14)
3 PRESETS, ENDLESS COMBINATIONS: Espresso, coffee or simply hot water, take your pick. Cappuccino lovers, top your coffee...
As an affiliate, we earn on qualifying purchases.
Importance of Regular Maintenance
Regular maintenance is crucial for the optimal performance and longevity of your professional dishwasher. It’s of utmost importance to understand the significance of regular maintenance to prevent mold growth and ensure the smooth functioning of your appliance.
Regular maintenance plays a critical role in preventing mold growth in your professional dishwasher. Mold can develop in the hidden corners and crevices of the dishwasher, especially in areas where water tends to accumulate. By conducting regular maintenance, such as cleaning the filters, removing debris, and inspecting the interior for any signs of mold, you can effectively prevent its growth. Mold not only affects the cleanliness of your dishes but also poses a health risk for both your staff and customers.
Additionally, regular maintenance helps to maintain the optimal performance of your professional dishwasher. Over time, mineral deposits, grease, and food particles can accumulate in various components, leading to clogs and reduced efficiency. By regularly cleaning and inspecting these components, such as the spray arms, nozzles, and drain system, you can ensure that your dishwasher operates at its peak performance, providing you with sparkling clean dishes every time.


Philips 3200 Series Fully Automatic Espresso Machine, LatteGo Milk Frother, 5 Coffee Varieties, Intuitive Touch Display, 100% Ceramic Grinder, AquaClean Filter, My Coffee Choice, Black (EP3241/54)
5 AROMATIC COFFEES: Enjoy your favorite coffees for special moments. Whether you crave an espresso, coffee, americano, cappuccino...
As an affiliate, we earn on qualifying purchases.
Cleaning the Interior of the Dishwasher
To clean the interior of the dishwasher, we start by removing the racks and utensil holders. This allows us to access all areas of the dishwasher for a thorough cleaning.
Here are three recommended cleaning techniques and products to effectively clean the interior of your dishwasher:
- Vinegar and Baking Soda Solution: Create a mixture of equal parts vinegar and baking soda. Apply the solution to a damp cloth or sponge and wipe down the interior surfaces of the dishwasher, paying special attention to the spray arms and filters. Rinse with clean water.
- Dishwasher Cleaner Tablets: Use dishwasher cleaner tablets specifically designed for removing buildup and odors. Follow the manufacturer’s instructions for the best results. These tablets are formulated to dissolve and remove mineral deposits, grease, and other residues.
- Citric Acid Solution: Dissolve citric acid powder in warm water according to the package instructions. Apply the solution to a cloth or sponge and wipe down the interior surfaces of the dishwasher. This method helps remove hard water stains and mineral deposits.
Remember to always refer to your dishwasher’s manual for any specific cleaning instructions or recommendations. Regularly cleaning the interior of your dishwasher will help maintain its performance and extend its lifespan.

De'Longhi Magnifica Evo Automatic Espresso & Coffee Machine with Manual Milk Frother, Built-in Grinder & Auto-Clean Function - For Latte, Cappuccino, Americano, Iced Coffee, ECAM29043SB
5 ONE-TOUCH RECIPES: 5 one-touch or customized coffee drinks: Espresso, Coffee, Americano, Iced Coffee, Long
As an affiliate, we earn on qualifying purchases.
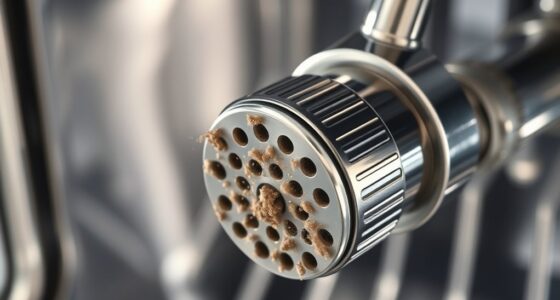
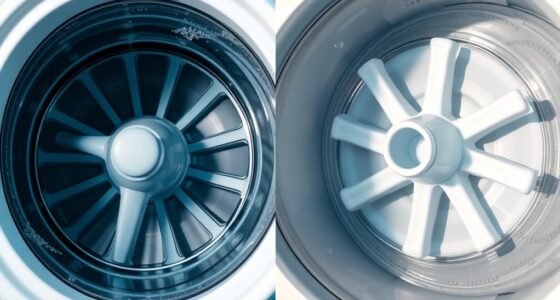
Inspecting and Cleaning Spray Arms
Now let’s move on to inspecting and cleaning the spray arms, a crucial aspect of maintaining your professional dishwasher.

To ensure proper cleaning performance, it’s important to regularly clean the spray arms, removing any debris or clogs that may hinder their effectiveness.
Additionally, checking the spray arms for any signs of damage or wear is essential to prevent further issues and ensure optimal performance.
Cleaning Spray Arm
After inspecting the spray arm for any clogs or blockages, we can effectively clean it using a vinegar solution. The vinegar solution helps to remove any mineral deposits or debris that may be obstructing the spray arm’s performance.
Here are three steps to clean the spray arm:

- Remove the spray arm: Carefully detach the spray arm from the dishwasher by unscrewing it or releasing any clips or brackets holding it in place.
- Soak in vinegar solution: Fill a container with equal parts vinegar and water. Submerge the spray arm in the solution and let it soak for about 30 minutes to dissolve any buildup.
- Scrub and rinse: Use a soft brush or toothbrush to gently scrub the spray arm, paying attention to the nozzles. Rinse the spray arm thoroughly with water to remove any remaining vinegar solution or debris.
Regularly cleaning the spray arm ensures optimal water flow and efficient cleaning performance.
Checking Spray Arm
As we inspect and clean the spray arms, it is important to ensure their optimal performance and efficiency in the dishwasher. The spray arms play a crucial role in distributing water and detergent evenly, resulting in clean and spotless dishes. To maintain their functionality, it is essential to regularly clean the nozzles to prevent any blockages that may hinder their performance. Troubleshooting spray arm issues involves checking for clogs, cracks, or any signs of wear and tear. If any issues are detected, they should be addressed promptly to avoid further damage. Here is a table to help you understand the common problems and their possible solutions:
| Problem | Possible Solution |
|---|---|
| Clogged nozzles | Clean the nozzles using a toothpick or small brush |
| Cracked spray arm | Replace the spray arm |
| Worn-out bearings | Replace the bearings |
Maintenance for Spray Arm
Continuing our inspection and cleaning process, we’ll now focus on maintaining the spray arm by inspecting and cleaning it regularly.
The spray arm plays a crucial role in ensuring efficient washing and rinsing in your dishwasher. To keep it in optimum condition, follow these maintenance steps:

- Inspect for clogs: Check the spray arm for any debris or clogs that may hinder its proper functioning. Remove and clean any obstructions found.
- Clean the spray arm: Regularly remove the spray arm and clean it thoroughly with warm soapy water. Use a brush to scrub away any residue or mineral deposits.
- Troubleshoot spray arm rotation: If the spray arm isn’t rotating as it should, ensure that it’s properly attached and secure. Check for any blockages in the spray arm holes and clear them if necessary.

Blender, 68Oz. Countertop Blenders with 20Oz. Grinder, 28000 RPM Kitchen Blender for Smoothies, Ice Crushing, Frozen Fruits, Self-Cleaning, Speed Adjustable. Black
【1400W Blending Power & 1800W Peak Power】- Experience unmatched performance. The 1400W motor (with 1800W peak power) and...
As an affiliate, we earn on qualifying purchases.
Removing and Cleaning the Filters
To begin the process, we first need to locate and remove the filters in our professional dishwasher. The filters are crucial components that help to trap food particles and prevent them from clogging the dishwasher’s spray arms and drain system. Proper cleaning techniques and regular filter maintenance are essential to ensure the efficient operation of the dishwasher.
Start by consulting the manufacturer’s manual or guide to locate the filters in your specific dishwasher model. Most professional dishwashers have two types of filters: the main filter and the fine filter. The main filter is typically located at the bottom of the dishwasher, while the fine filter is usually found beneath the main filter.
To remove the filters, gently lift them out of their designated slots. Be cautious not to damage or bend the filters during the process. Once removed, inspect the filters for any visible debris or food particles. Rinse them under running water to remove any stubborn residue.
For a thorough cleaning, use a soft brush or toothbrush to scrub the filters gently. Pay close attention to the crevices and hard-to-reach areas where buildup may occur. Avoid using abrasive cleaners or harsh chemicals that could damage the filters.

After cleaning, ensure that the filters are completely dry before reinserting them into the dishwasher. Properly reinstall the filters in their respective slots, ensuring a snug fit.
Regular cleaning and maintenance of the filters will prolong the lifespan of your professional dishwasher while ensuring optimal performance.
Checking and Cleaning the Drain Pump
Now let’s move on to checking and cleaning the drain pump of our professional dishwasher. The drain pump plays a crucial role in removing wastewater from the dishwasher, ensuring efficient operation. It’s important to regularly inspect and clean the drain pump to prevent any potential issues that may arise.
To effectively clean the drain pump, follow these steps:

- Disconnect the dishwasher from the power source and remove the bottom panel to access the drain pump.
- Inspect the drain pump for any debris or clogs that may be obstructing its operation.
- Carefully remove any debris or buildup using a soft brush or cloth. Pay close attention to the impeller blades, as they can become clogged with food particles.
- In addition to cleaning the drain pump, it’s also important to regularly clean the drain hose. Disconnect the hose from the pump and check for any blockages. If necessary, use a plumbing snake or brush to remove any buildup.
When troubleshooting drain pump issues, consider the following:
- Check for any loose connections or damaged parts that may be affecting the pump’s performance.
- Ensure that the pump is receiving adequate power by checking the electrical connections.
- If the drain pump continues to malfunction despite cleaning and troubleshooting efforts, it may be necessary to replace the pump entirely.
Maintaining the Door Gasket
Now let’s talk about maintaining the door gasket of your professional dishwasher.
Cleaning the gasket regularly is essential to prevent the build-up of food debris and ensure a tight seal. This will help prevent leaks and maintain the dishwasher’s efficiency.
Additionally, it’s important to check for any signs of mold growth and replace worn gaskets promptly to maintain optimal performance.
Cleaning the Gasket
We clean the door gasket of our professional dishwasher using a soft cloth and a mild detergent solution. Properly maintaining the gasket is crucial for preventing leaks and ensuring the efficient operation of the dishwasher.
Here are three cleaning techniques to keep the gasket in optimal condition:
- Regular Cleaning: Wipe the gasket with a soft cloth soaked in a mild detergent solution. Ensure that all dirt, debris, and residue are removed from the gasket.
- Inspect for Damage: Periodically check the gasket for any signs of wear, tear, or damage. This includes cracks, tears, or mold growth. If any damage is found, promptly replace the gasket to prevent leaks.
- Lubrication: Apply a thin layer of food-grade lubricant to the gasket to keep it flexible and prevent it from drying out. This will help maintain a proper seal and prevent leaks.
Preventing Mold Growth
To prevent mold growth and maintain the door gasket of our professional dishwasher, we regularly clean and disinfect it using a vinegar solution.
However, preventing condensation and controlling humidity are also crucial in preventing mold growth. High humidity levels create an ideal environment for mold to thrive, so it’s important to keep the dishwasher area well-ventilated. This can be achieved by ensuring proper airflow around the dishwasher and using dehumidifiers if necessary.

Additionally, avoiding excess moisture buildup on the gasket is essential. After each use, we recommend wiping the gasket dry with a clean cloth to remove any residual moisture.
Regularly inspecting the gasket for signs of mold or mildew and promptly addressing them with a vinegar solution or mildew remover will help maintain a clean and mold-free dishwasher gasket.
Replacing Worn Gaskets
To maintain the door gasket of our professional dishwasher, it’s important to regularly check for wear and tear and replace any worn gaskets. The door gasket plays a crucial role in creating a watertight seal, preventing leaks and ensuring optimal performance of the dishwasher.
Here are three key steps to follow when replacing gaskets:

- Inspect the gasket: Regularly examine the door gasket for signs of wear, such as cracks, tears, or brittleness. This can be done by visually inspecting the gasket or running a finger along its surface to feel for any abnormalities.
- Remove the old gasket: Carefully remove the old gasket by pulling it out from its groove. Make sure to clean any residue or debris that may have accumulated in the groove.
- Install the new gasket: Align the new gasket with the groove and press it firmly into place. Ensure that it’s evenly seated and there are no gaps or overlapping sections.
Cleaning and Descaling the Dishwasher
Regular cleaning and descaling of your professional dishwasher is essential for optimal performance and longevity. Over time, mineral deposits and food particles can build up inside your dishwasher, affecting its ability to clean effectively. To prevent this, it’s important to follow proper cleaning techniques and troubleshooting tips.
To start, remove any leftover food debris from the dishwasher’s interior and filters. Use a soft brush or cloth to clean the spray arms and nozzles, ensuring they’re free from blockages. Pay attention to the dishwasher’s door gasket, as it can accumulate dirt and grime. Clean it using a mild detergent and warm water, making sure to remove any residue.
Descaling your dishwasher is also crucial to maintain its efficiency. Hard water can cause limescale buildup, hindering the dishwasher’s performance. To descale, fill a cup with white vinegar and place it on the top rack. Run a hot water cycle without detergent, allowing the vinegar to dissolve the limescale. For stubborn deposits, you may need to use a commercial descaler following the manufacturer’s instructions.
Regularly cleaning and descaling your professional dishwasher will help prevent clogs, improve cleaning performance, and extend its lifespan. Now that we’ve covered cleaning and descaling, let’s move on to the next section: lubricating moving parts.
Lubricating Moving Parts
Now, let’s delve into the proper care and maintenance of your professional dishwasher by exploring the importance of lubricating its moving parts.
Lubricating the moving parts of your dishwasher is crucial for ensuring its smooth operation and preventing rust. Here are three key reasons why lubrication is essential:
- Improved Performance: Lubricating the moving parts such as the pump, motor, and spray arms reduces friction and allows them to move effortlessly. This ensures that your dishwasher operates at its optimal level, delivering excellent cleaning results every time.
- Extended Lifespan: Regular lubrication helps to prevent wear and tear on the moving parts, which can lead to premature failure. By reducing friction, lubrication minimizes the stress on these components, helping to extend their lifespan and saving you from costly repairs or replacements.
- Prevention of Rust: Moisture and exposure to water can cause rust to develop on the metal components of your dishwasher. Applying lubricant to these parts creates a protective barrier, preventing moisture from reaching the surfaces and inhibiting rust formation.
To properly lubricate the moving parts of your dishwasher, refer to the manufacturer’s instructions for the recommended lubricant type and application method. Remember to clean the parts thoroughly before lubricating and ensure that excess lubricant is wiped away.
Checking and Tightening Electrical Connections
When maintaining our professional dishwasher, it is important to regularly check and tighten electrical connections. Loose or faulty electrical connections can lead to various issues, including power failure and malfunctioning of the dishwasher. By ensuring that all electrical connections are secure, we can prevent potential problems and ensure the smooth operation of our dishwasher.

To help you troubleshoot electrical issues and properly tighten electrical connections, refer to the table below:
| Electrical Connection | Steps to Check and Tighten |
|---|---|
| Power cord | 1. Switch off the power supply to the dishwasher. |
| 2. Inspect the power cord for any visible damage. | |
| 3. If the power cord is damaged, replace it. | |
| 4. If the power cord is intact, ensure it is securely connected to the dishwasher. | |
| Control panel connections | 1. Switch off the power supply to the dishwasher. |
| 2. Remove the control panel cover. | |
| 3. Inspect the connections for any loose wires. | |
| 4. If any connections are loose, tighten them carefully using a screwdriver. |
Regularly checking and tightening electrical connections is an essential part of dishwasher maintenance. By following these steps, you can prevent electrical issues and keep your professional dishwasher running smoothly. Remember to always ensure the power supply is switched off before inspecting or working on any electrical connections.
Testing and Calibrating Water Temperature
To test and calibrate the water temperature, we’ll use a thermometer and follow the manufacturer’s instructions. Here are the steps to ensure accurate water temperature measurement and calibration:
- Gather the necessary equipment: a thermometer capable of measuring high temperatures, gloves, and safety goggles.
- Start by verifying the temperature settings on the dishwasher. Make sure it’s set to the desired temperature specified by the manufacturer.
- Run a regular wash cycle without any dishes to obtain a water temperature reading. Insert the thermometer into the water flow, ensuring it’s submerged but not touching the dishwasher’s heating element.
- Take multiple temperature readings throughout the wash cycle to ensure consistency. Record the highest temperature reached.
- Compare the recorded temperature with the manufacturer’s recommended temperature range. If the measured temperature falls outside this range, the dishwasher’s thermostat may need calibration.
- If the water hardness is a concern, test it using a water hardness testing kit. Hard water can affect the dishwasher’s performance and require adjustments to the water temperature or detergent dosage.
Testing and calibrating the water temperature is crucial for optimal dishwasher operation. By ensuring accurate temperature readings, you can troubleshoot temperature fluctuations more effectively.

In the next section, we’ll discuss common issues related to dishwasher temperature and how to troubleshoot them.
Transition: Now that we’ve covered testing and calibrating water temperature, let’s move on to troubleshooting common issues that may arise in your professional dishwasher.
Troubleshooting Common Issues
Moving on to troubleshooting common issues, we can address some potential problems that may arise in your professional dishwasher. To help you quickly identify and resolve these issues, we have provided a table below outlining two common problems and their solutions.
| Problem | Solution |
|---|---|
| Troubleshooting Leaks | – Check the door gasket for any signs of damage or wear. |
| – Ensure the drain hose is properly connected and not clogged. | |
| – Inspect the water inlet valve for leaks or malfunctions. | |
| Fixing Clogged Spray Nozzles | – Remove the spray arms and clean them thoroughly. |
| – Check the nozzles for any blockages and clear them if needed. | |
| – Run the dishwasher with a vinegar rinse to remove buildup. |
By following these troubleshooting steps, you can address leaks and clogged spray nozzles, two common issues that may affect the performance of your professional dishwasher. Once you have resolved these problems, it is important to schedule regular maintenance services to prevent future issues and ensure optimal performance.
In the next section, we will discuss the importance of scheduling professional maintenance services and how it can prolong the lifespan of your dishwasher.
Scheduling Professional Maintenance Services
Our team recommends scheduling regular professional maintenance services to ensure the optimal performance and prolong the lifespan of your professional dishwasher. Scheduling service appointments with reliable technicians is crucial to keep your dishwasher running smoothly. Here are three important considerations when it comes to scheduling professional maintenance services:
- Frequency: Determine how often your dishwasher requires maintenance based on factors such as usage, water quality, and manufacturer recommendations. Most manufacturers recommend scheduling maintenance at least once a year. However, high-volume establishments may need more frequent maintenance to keep up with their demanding workload.
- Qualified Technicians: When scheduling service appointments, it’s essential to find reliable technicians who are experienced and knowledgeable in servicing professional dishwashers. Look for technicians who are certified by the manufacturer or have extensive training in commercial dishwasher maintenance. They should have a deep understanding of the specific model you own and be equipped with the necessary tools and parts to handle any potential repairs or replacements.
- Planned Downtime: Plan your maintenance appointments during periods of low demand or downtime to minimize disruption to your operations. Coordinate with the service provider to find a suitable time that aligns with your business schedule. This ensures that your dishwasher receives the necessary attention without causing inconvenience to your staff or customers.
Frequently Asked Questions
How Often Should I Clean the Dishwasher’s Exterior?
When it comes to cleaning the dishwasher’s exterior, it’s important to follow proper techniques to maintain its professional appearance. Regular cleaning is recommended to prevent buildup and keep the exterior looking pristine.
For stubborn stains, there are a few tips that can help. Using a mild detergent and warm water, gently scrub the affected area. For tougher stains, a mixture of vinegar and baking soda can be effective.

Remember to always read the manufacturer’s instructions for specific cleaning recommendations.
Can I Use Regular Dish Soap to Clean the Interior of the Dishwasher?
Using regular dish soap to clean the interior of a dishwasher isn’t recommended. Regular dish soap can create excessive suds and damage the dishwasher’s components.
Instead, we suggest using a mixture of vinegar and baking soda. Vinegar helps remove mineral buildup and odors, while baking soda acts as a gentle abrasive to remove stains and residue.
Simply sprinkle baking soda on the interior, spray vinegar, and scrub gently. Rinse thoroughly to maintain a clean and efficient dishwasher.

Is It Necessary to Remove and Clean the Spray Arms if They Appear to Be Working Fine?
It is necessary to remove and clean the spray arms regularly, even if they appear to be working fine. Neglecting spray arm maintenance can lead to clogs and reduced cleaning performance.
Signs of spray arm damage include bent or cracked arms, loose fittings, or a lack of water flow. Cleaning the spray arms involves removing them, rinsing them thoroughly, and clearing any debris or buildup.
This ensures optimal performance and extends the lifespan of your professional dishwasher.
Should I Clean the Filters After Every Use or Only When They Are Visibly Dirty?
Should we clean the filters after every use or only when they’re visibly dirty?

Cleaning the filters regularly is crucial for maintaining the optimal performance of our professional dishwasher. Neglecting to clean them can have a detrimental impact on the dishwasher’s efficiency and effectiveness. Regular filter cleaning ensures that debris and food particles are efficiently removed, preventing clogs and ensuring sparkling clean dishes every time.
It’s a necessary step in our dishwasher maintenance routine that shouldn’t be overlooked.
How Can I Tell if the Drain Pump Needs Cleaning?
To determine if the drain pump needs cleaning, look for signs of a clogged drain pump. These may include:
- Slow drainage
- Standing water in the dishwasher
- Unusual noises during the draining process
Regular maintenance of the drain pump is important to prevent clogs and ensure efficient operation. By cleaning the drain pump regularly, you can avoid costly repairs and keep your professional dishwasher running smoothly.

Conclusion
In order to ensure the optimal performance and longevity of your professional dishwasher, regular maintenance is crucial. By cleaning the interior, inspecting and cleaning the spray arms, removing and cleaning the filters, checking and cleaning the drain pump, and testing and calibrating water temperature, you can prevent common issues and keep your dishwasher running smoothly.
Remember, neglecting maintenance is like leaving a ship adrift in stormy waters – it’s bound to encounter problems. Stay proactive and schedule professional maintenance services to keep your dishwasher sailing smoothly.