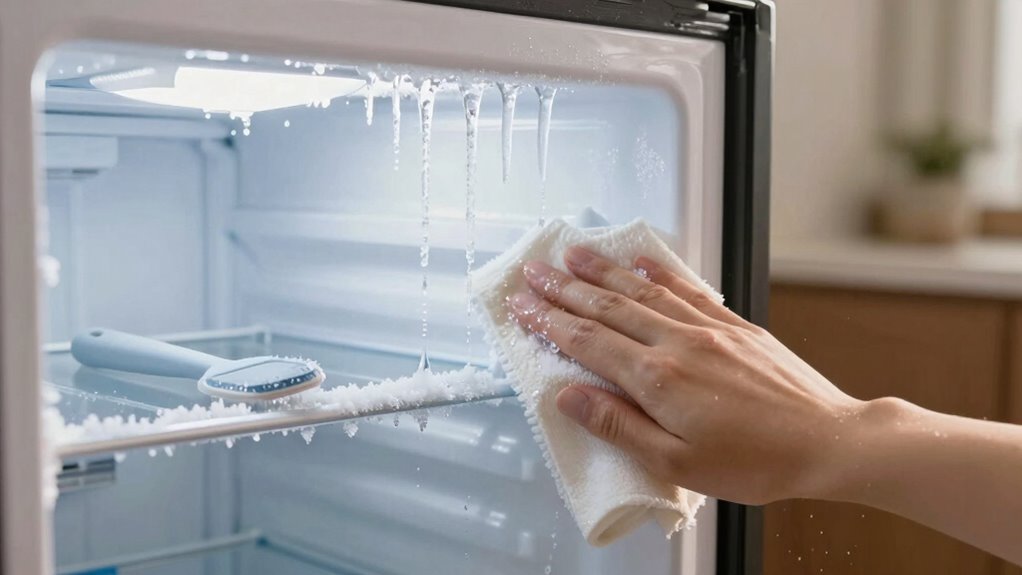
To defrost your freezer faster and safely, focus on clearing ice around the evaporator fan to assure proper airflow and check that the defrost drain isn’t clogged, which can slow melting. Use bowls of warm water inside the freezer to soften the ice gently instead of scraping with sharp tools. Keep the drain clear and wipe away water to prevent refreezing. If you want more tips to speed up the process, continue exploring proven tricks that work.
Key Takeaways
- Unplug the freezer and remove all contents before starting to prevent accidents.
- Use bowls of warm (not hot) water inside the freezer to soften ice and speed up melting.
- Clear ice around the evaporator fan and check the defrost drain for blockages to ensure proper drainage.
- Keep the drain open and regularly flush it with warm water to prevent clogs and reduce defrost time.
- Dry the interior thoroughly after defrosting to prevent rapid ice buildup and ensure efficient operation.

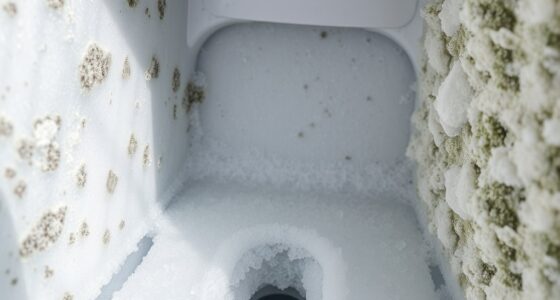
When your freezer is packed with thick ice buildup, defrosting it can feel like a time-consuming chore. However, understanding a few key components can help you do it faster and more efficiently. One essential part is the evaporator fan, which circulates cold air inside the freezer. When ice accumulates around it, the fan struggles to operate properly, slowing down the defrost process. Before starting, unplug your appliance and locate the evaporator fan, usually behind a panel at the back or bottom of the freezer. Clearing ice around the fan ensures it can run smoothly once powered back on, helping to distribute heat during defrosting and melt the ice more evenly. Additionally, proper navigation and mapping of your freezer’s interior can make targeted defrosting easier and prevent excessive ice buildup in the future.
Another vital element is the defrost drain, a small pipe that channels excess water from melting ice to a drain pan beneath the freezer. If this drain becomes clogged with ice or debris, water won’t drain properly, leading to longer defrost times or water pooling inside. To speed things up, check the defrost drain for blockages before you start. You can flush it with warm water or gently use a flexible wire to clear any obstructions. Doing this prevents water from refreezing and creates a clear path for melting ice to drain away, reducing the overall defrost duration.
Check and clear the defrost drain to prevent clogs and reduce defrost time.
Once you’ve addressed these components, you can accelerate the defrosting process by using warm, not hot, water. Place bowls of warm water inside the freezer and close the door. The steam and heat from the water will weaken the ice bonds, making it easier to remove thick ice layers without excessive scraping. Avoid using sharp objects that could damage your freezer’s interior or puncture the evaporator coils. Instead, let the warm water do the work, and periodically replace the bowls as they cool down.
As the ice begins to loosen, make sure your defrost drain remains clear and unobstructed so melting water can flow freely out of the freezer. Keep a towel handy to soak up any excess water and wipe down interior surfaces as the ice melts. Once the ice is fully gone, dry out the interior thoroughly to prevent new ice buildup. Reinstall any panels you removed, plug in your freezer, and give it time to reach the proper temperature. By paying attention to the evaporator fan and defrost drain beforehand, you’ll find your defrosting process quicker, cleaner, and more effective.

AMI PARTS WR51X10055 Refrigerator Defrost Heater Kit, Temperature Sensor WR55X10025, High Limit Thermostat WR50X10068 Replacement Compatible with General Electric
- Part Number: WR51X10055 Defrost Heater Kit
- Function: Melts ice, improves food storage
- Temperature Sensor: Sends temperature readings to control board
As an affiliate, we earn on qualifying purchases.
As an affiliate, we earn on qualifying purchases.
Frequently Asked Questions
Can Using Hot Water Damage My Freezer?
Using hot water can damage your freezer because hot water hazards include warping or cracking the plastic and damaging the seals, which may lead to leaks or reduced efficiency. It might also cause freezer damage if the sudden temperature change stresses the appliance’s components. Instead, opt for safer methods like warm water or gentle scraping to defrost efficiently without risking harm to your freezer.
Is It Safe to Use a Hairdryer During Defrosting?
Using a hairdryer during defrosting is like playing with fire—it’s risky. While it might seem quick, hairdryer safety isn’t guaranteed, and you risk electrical hazards or damaging your freezer’s components. If you choose this method, keep the dryer at a safe distance, avoid water contact, and never leave it unattended. Otherwise, it’s better to stick with safer, proven tricks to melt the ice without risking your appliance or safety.
How Often Should I Defrost My Freezer?
You should defrost your freezer when the ice buildup reaches about a quarter-inch thick, typically every 3 to 6 months. Maintaining a regular maintenance routine helps prevent excessive ice accumulation and keeps it running efficiently. Keep an eye on the defrosting frequency, especially if you notice increased frost, to avoid overworking your freezer. Regular defrosting ensures peak performance and saves energy, making your appliance last longer.
Can I Leave Food Inside During Defrosting?
Like leaving your smartphone on airplane mode, you shouldn’t leave food inside during defrosting. Doing so risks food safety, as thawing can cause bacteria to grow. For proper freezer maintenance, remove all items before starting, ensuring safe, quick defrosting. Keep the process efficient by placing a towel or tray underneath to catch melting ice. This approach maintains food quality and keeps your freezer in top shape.
What Are the Signs My Freezer Needs Defrosting Urgently?
You need to defrost your freezer urgently when you notice significant ice buildup or efficiency decline. Thick ice layers can block airflow, making your freezer work harder and increasing energy bills. If you see frost over ¼ inch thick or find your freezer struggling to maintain proper temperature, it’s time to defrost. Acting promptly prevents further issues, extends the appliance’s lifespan, and keeps your food fresh and safe.
Conclusion
Now that you’ve learned some clever tricks to speed up your freezer’s defrosting, you can approach the task with confidence and ease. Think of it as giving your appliance a gentle refresh, helping it run smoothly and efficiently again. With a little patience and these safe tips, you’ll have your freezer feeling fresh and ready to serve in no time. Embrace the process, and enjoy the quiet harmony of a well-maintained kitchen.