
This guide explains how to descale a tankless water heater, a necessary maintenance task to remove mineral deposits that can impair function. Suitable for homeowners with basic DIY skills, this process restores water heater efficiency and prevents costly repairs. Expect to spend about 1 to 2 hours completing this task.
Difficulty: Intermediate | Time: 1-2 hours
What You’ll Need
Tools & Materials:
- Adjustable wrench
- Large bucket or container
- Hose
- Screwdriver
- Pliers
- Rubber gloves
- Safety goggles
Knowledge:
- Basic plumbing skills
- Ability to turn off water and power supplies
Ensure the water heater is turned off and cooled down before starting. Gather all tools and materials in advance to avoid interruptions.

Chromex Tankless Water Heater Flush Kit with NSF Certified Liquid Descaling Solution and 1/6HP Extra Strength Pump
- Complete Flush Kit: Includes pump, hoses, bucket, and descaler
- Universal Compatibility: Fits most tankless water heater brands
- Effective Scale Removal: Cleans and extends heater lifespan
As an affiliate, we earn on qualifying purchases.
As an affiliate, we earn on qualifying purchases.
Before You Start
Turn off the power supply to the water heater at the breaker box. Shut off the main water supply. Open a hot water faucet nearby to relieve pressure and drain excess water. Confirm that the unit is cool enough to handle safely.
Step-by-Step Instructions
Step 1: Turn off power and water supplies
Switch off the circuit breaker connected to the water heater. Close the main water supply valve to stop incoming water flow.
Tip: Double-check that the power is off by testing the unit’s display or indicator lights before proceeding.
Check: Power is off and water supply is closed; the heater displays no activity.
Step 2: Drain the water heater
Open the hot water faucet to release pressure. Attach a hose to the drain valve located at the bottom of the unit, place the other end into a bucket or drain, then open the drain valve to empty the tank.
Tip: Ensure the drain is fully open to prevent back pressure and allow complete drainage.
Check: The tank drains completely without leaks or blockages.
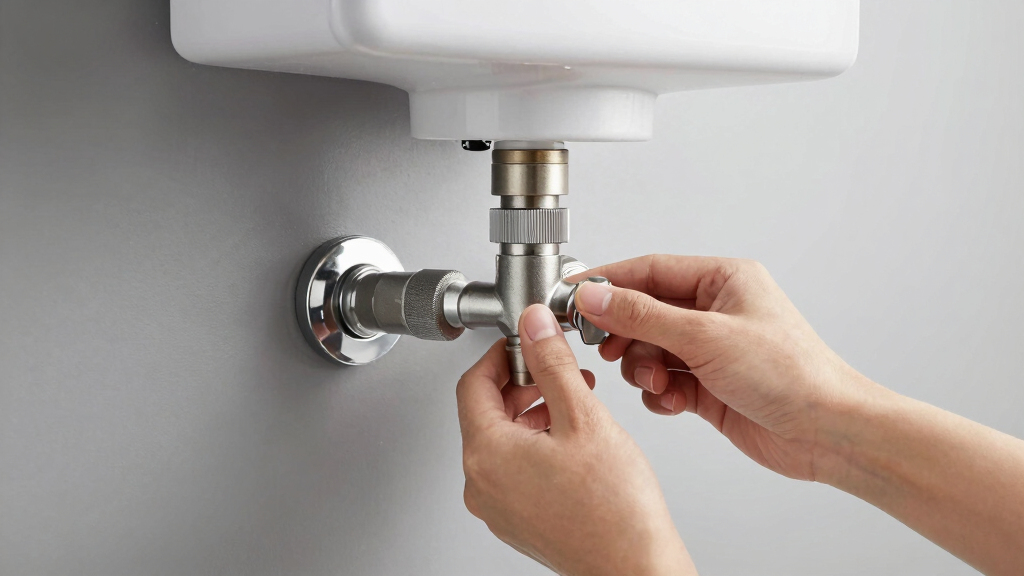
Step 3: Disconnect inlet and outlet hoses
Use pliers or a wrench to loosen and disconnect the cold water inlet and hot water outlet fittings from the unit.
Tip: Keep a bucket handy to catch any residual water that may spill during disconnection.
Check: Hoses are disconnected and fittings are free of debris.
Step 4: Prepare descaling solution
Mix a descaling solution using 50% white vinegar and 50% water in a large bucket or container.
Tip: Use white vinegar for an effective, chemical-free cleaning process; avoid using harsh chemicals.
Check: Solution is ready and at room temperature.
Step 5: Connect hoses for flushing
Attach one end of a hose to the inlet water port and the other end to the bucket with the vinegar solution. Connect another hose from the outlet port back into the bucket or drain.
Tip: Ensure all connections are tight to prevent leaks during flushing.
Check: Hoses are securely attached, with no leaks or loose fittings.
Step 6: Flush the system with vinegar solution
Open the cold water inlet valve slightly to allow the vinegar solution to flow through the heater for 45 to 60 minutes. Occasionally, gently stir or agitate the setup to improve cleaning.
Tip: Do not operate the heater during this process; only allow the solution to circulate passively.
Check: The solution flows smoothly through the system and the buildup begins to dissolve.
Step 7: Rinse the system with clean water
Close the vinegar inlet valve. Disconnect the vinegar hoses and connect the inlet and outlet hoses to the unit. Turn on the cold water supply to flush out remaining vinegar and mineral deposits for 5-10 minutes.
Tip: Run water through the system until the smell of vinegar dissipates and water runs clear.
Check: Water runs clear and free of vinegar smell, indicating thorough rinsing.
Step 8: Reconnect fittings and restore power
Turn off the water supply, disconnect hoses, and reconnect the inlet and outlet fittings tightly. Turn on the main water supply and then restore power at the breaker box.
Tip: Check all connections for leaks before fully restoring power.
Check: Heater powers on, with no leaks or error messages, and hot water is available.
Common Mistakes to Avoid
- Not shutting off power before starting — Always turn off the electrical supply at the breaker box before working on the water heater to avoid electrical shock.
- Using harsh chemicals instead of vinegar — Stick to white vinegar or manufacturer-recommended descaling solutions to prevent damage.
- Failing to flush thoroughly after descaling — Run plenty of clean water through the system until the vinegar smell and deposits are gone.
- Over-tightening fittings — Tighten fittings securely but avoid excessive force to prevent damage or leaks.
Troubleshooting
Problem: Heater does not turn on after restoring power
Solution: Check that all electrical connections are secure and circuit breakers are on. Inspect for error codes or warning lights.
Problem: Leaks after reconnecting hoses
Solution: Tighten fittings carefully, and use thread sealant or Teflon tape if needed. Recheck for leaks before restoring full water flow.
Problem: Water flow is weak or inconsistent
Solution: Ensure no debris blockages in the inlet or outlet. Flush the system thoroughly during rinsing.
What Success Looks Like
The water heater operates normally with no leaks, hot water flows at expected pressure, and mineral deposits are visibly reduced or eliminated. The unit should run smoothly without error messages or unusual noises.
Next Steps
Implement regular maintenance, including annual descaling. Keep a record of service dates. Consider installing a water softener if mineral buildup is a recurring issue. Seek professional help if problems arise that you cannot resolve yourself.
Frequently Asked Questions
How often should I descale my tankless water heater?
Typically, every 6 to 12 months, especially if you have hard water. More frequent cleaning may be necessary in very hard water areas.
Can I use chemical descaling agents instead of vinegar?
Yes, commercial descaling solutions are available, but always follow the manufacturer’s instructions. Vinegar is a safe, inexpensive, and effective alternative for most households.
Is descaling safe for my water heater?
Yes, when done correctly, descaling is a routine maintenance practice that prolongs the life of your heater and maintains efficiency. Avoid aggressive chemicals that could damage components.
What should I do if I see error messages after descaling?
Turn off the unit, check all connections, and consult the user manual for error codes. If problems persist, contact a professional technician for inspection.