Start by checking that your dryer is properly plugged in and the circuit breaker hasn’t tripped. Next, inspect the heating element, thermostat, and thermal fuse for damage or continuity with a multimeter. Clean out lint from the trap and vents to prevent overheating. If you have a gas dryer, ensure the gas supply is on and functioning. For persistent issues, exploring further troubleshooting steps can help pinpoint the cause.
Key Takeaways
- Verify the dryer is properly plugged in and the circuit breaker or fuse is functioning correctly.
- Inspect the heating element, thermostat, and thermal fuse for damage or continuity using a multimeter.
- Clean the lint trap, vent hose, and outside vent to ensure unobstructed airflow.
- Confirm the gas supply is turned on and check for leaks if using a gas dryer.
- Seek professional help if electrical components are damaged or if troubleshooting doesn’t resolve the issue.
Checking the Power Supply and Circuit Breaker
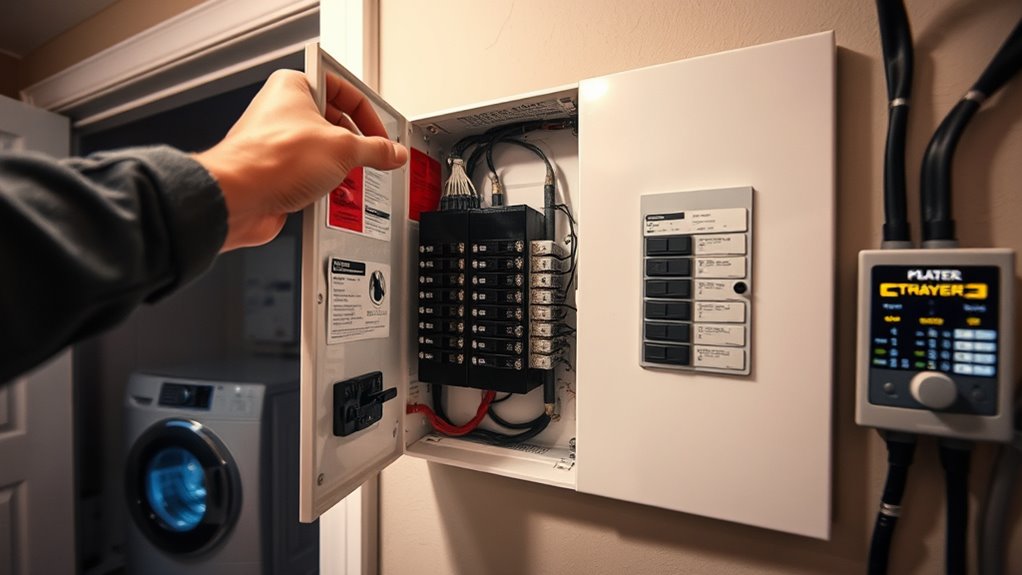
Before inspecting other components, you should first verify that your dryer is receiving power. Check if it’s plugged in securely and that the outlet has power. You can test the outlet by plugging in another device, like a lamp, to ensure it works. Next, look at your circuit breaker or fuse box. If your dryer’s circuit breaker has tripped, it will shut off power to prevent damage. Reset the breaker by flipping it off and back on. If there’s a blown fuse, replace it. Sometimes, a simple power issue is the cause of your dryer not heating. Ensuring the dryer has proper power supply is the essential first step before moving on to other checks. Additionally, inspecting electrical safety measures ensures safe troubleshooting during this process. Checking the circuit breaker and understanding how it functions can help prevent further electrical issues. Remember, always turn off the power before handling electrical components to avoid electric shock hazards. Being aware of home electrical systems can help you identify and address issues more effectively.
Inspecting the Dryer’s Heating Element
To determine if the heating element is causing your dryer not to heat, you need to inspect it for visible damage or breaks. Unplug the dryer first to ensure safety. Remove the back panel or access panel to reach the heating element. Look for obvious signs of damage, such as cracks, breaks, or burn marks. Check for broken or damaged wires connected to the element. Test the element with a multimeter for continuity; no continuity indicates a faulty element. Keep in mind, a damaged element can cause your dryer to stop heating altogether. Recognizing the importance of proper maintenance can help prevent future issues with your appliance. Additionally, inspecting the fabric decorating markers used on nearby components can ensure that no accidental damage has occurred from external sources. Regular preventive maintenance can extend the lifespan of your appliance and ensure optimal performance.
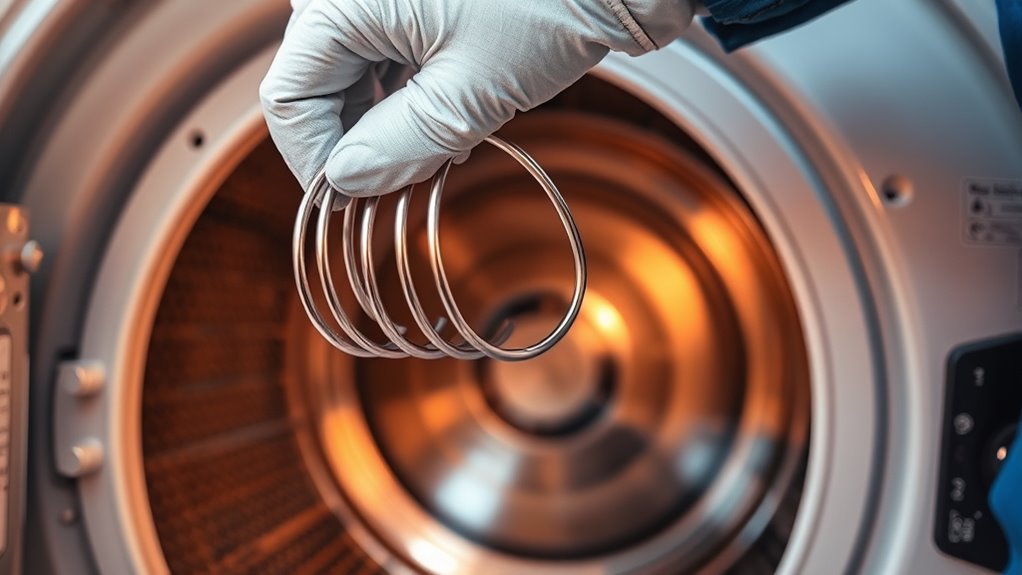
Examining the Thermostat and Thermal Fuse

To determine if the thermostat or thermal fuse is causing your dryer’s heating issue, start by checking the thermostat’s functionality with a multimeter. Then, test the thermal fuse for continuity—if it’s blown, it needs replacing. Watch for signs like frequent tripping or a blown fuse, which indicate these parts might be malfunctioning. Additionally, understanding dryer tuning and maintenance can help prevent future issues and ensure optimal performance. Regular inspection and proper care of your appliance can also contribute to preventative maintenance, reducing the likelihood of unexpected breakdowns. Properly maintaining your dryer with regular filter cleaning can further improve its efficiency and lifespan. Recognizing common trust issues can help identify underlying problems in your appliance or relationship with maintenance routines, emphasizing the importance of ongoing care. Incorporating scheduled inspections into your routine can catch potential problems early and extend your dryer’s service life.
Thermostat Functionality Check
If your dryer isn’t heating, checking the thermostat and thermal fuse is a crucial step. You need to verify the thermostat is functioning correctly, as it regulates the dryer’s temperature. To test it, disconnect power, remove the control panel, and locate the thermostat. Use a multimeter to check for continuity; a reading of zero or very low indicates it’s working. If there’s no continuity, the thermostat may be faulty and needs replacement.
Remember, the thermal fuse acts as a safety device that cuts power if the dryer overheats. Always test it after verifying the thermostat.
- Locate the thermostat and fuse inside the dryer
- Use a multimeter for continuity testing
- Replace faulty components promptly
- Always disconnect power before testing
Thermal Fuse Testing
When your dryer isn’t heating, testing the thermal fuse alongside the thermostat is a critical step. First, unplug the dryer and locate the fuse, usually near the blower wheel or heating element. Use a multimeter set to continuity mode to test the fuse; remove it from the circuit if necessary. A good fuse will beep or show zero resistance, indicating it’s functioning correctly. If the fuse doesn’t have continuity, it’s blown and needs replacing. Remember, the fuse acts as a safety device, cutting power if the dryer overheats. While testing, also check the thermostat, ensuring it cycles correctly. Addressing these components helps pinpoint whether the fuse has blown due to overheating or other issues. Replacing a blown fuse can restore your dryer’s heating functionality. Additionally, understanding the thermal fuse testing process can help prevent further damage and ensure safe operation. Proper testing of these components is essential to maintaining the dryer’s safety features and overall performance. Incorporating automation in business intelligence can also facilitate more efficient troubleshooting by analyzing diagnostic data rapidly. Staying informed about potential component failures can aid in proactive maintenance.
Signs of Malfunction
Are you noticing that your dryer runs but doesn’t produce heat? Several signs point to issues with the thermostat or thermal fuse. First, your clothes might come out damp or cold, even after a full cycle. You may also hear the dryer running longer than usual without drying clothes effectively. Another sign is a complete lack of heat, with the dryer tumbling but no warm air. Ultimately, frequent breaker trips or blown fuses can indicate a malfunction in these components. Additionally, understanding home security systems can help protect your appliances from electrical issues or damage.
Testing the Start Switch and Timer

To determine if the start switch and timer are causing your dryer’s heating issue, you should begin by testing these components for continuity. First, unplug your dryer to ensure safety. Remove the control panel or access panel to reach the start switch and timer. Use a multimeter set to the ohms setting to test each part. For the start switch, connect the probes to its terminals; a continuous reading indicates it’s working, while no continuity means it’s faulty. For the timer, check the terminal contacts as the cycle progresses; you should see changes in continuity. If either component shows no continuity when it should, replace it. Testing these parts helps pinpoint whether they’re preventing the dryer from heating properly.
Cleaning Lint Traps and Vents
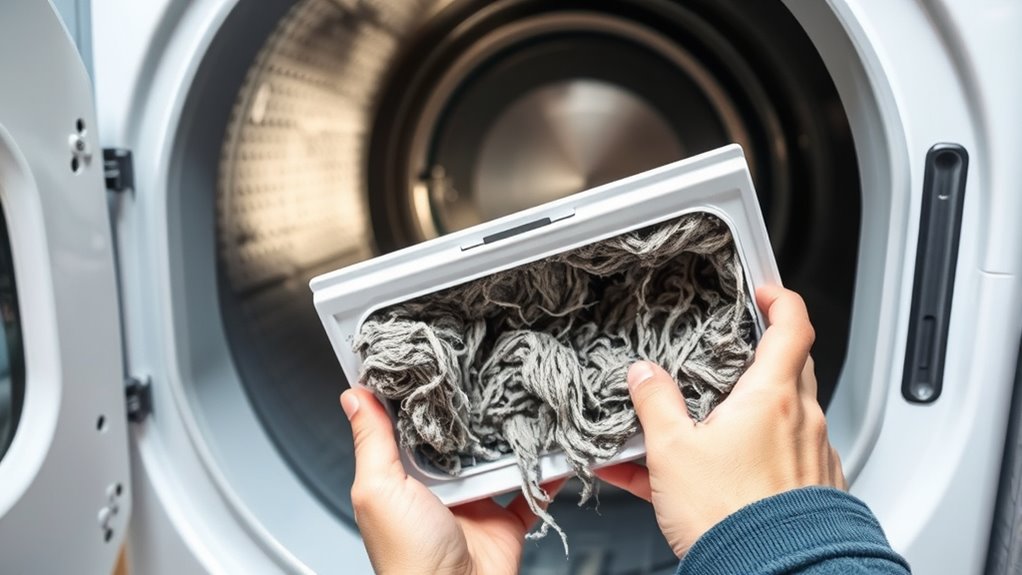
Clogged lint traps and vents can restrict airflow, causing your dryer to overheat and stop producing heat. When lint accumulates, it blocks the proper flow of air, making your dryer work harder and potentially shutting down to prevent damage. Regularly cleaning these parts improves efficiency and prevents overheating issues.
Make sure to:
- Remove lint from the lint trap after every load
- Use a brush or vacuum to clean the lint trap housing
- Check and clean the vent hose periodically
- Ensure the vent duct outside is free of obstructions
Evaluating the Gas Supply (for Gas Dryers)

Have you checked whether your gas supply is turned on and functioning properly? If the gas valve isn’t fully open, your dryer won’t receive enough fuel to generate heat. Verify the gas shut-off valve near the dryer is fully opened. Listen for a hissing sound when the valve is turned on—it indicates gas flow. If you smell gas or suspect a leak, turn off the valve immediately and ventilate the area. You can also check the gas line for kinks or blockages that might restrict flow. Sometimes, the gas supply may be interrupted due to utility issues or maintenance. Confirm with your gas provider if there’s an outage or service interruption in your area. Proper gas supply is essential for your dryer to heat efficiently.
When to Call a Professional Technician

If your dryer keeps malfunctioning despite troubleshooting, it’s time to call a professional. Continuing to use it could pose safety risks or cause further damage. Trust a technician to diagnose and fix issues safely and effectively.
Persistent Malfunctions
When your dryer continues to malfunction despite troubleshooting efforts, it’s time to contemplate professional help. Persistent issues often indicate underlying problems that aren’t easily fixed on your own. If you experience any of the following, calling a technician is your best move:
- Dryer runs but doesn’t produce heat after multiple resets
- Repeated trips of the circuit breaker when the dryer is on
- Unusual noises or burning smells during operation
- Dryer stops working suddenly without warning
These signs suggest complex electrical or mechanical issues that require specialized tools and expertise. Attempting to fix them yourself could lead to further damage or safety hazards. Trust a professional to diagnose the root cause and ensure your dryer operates safely and efficiently.
Safety Concerns
Because electrical and mechanical issues can pose safety risks, recognizing when to call a professional technician is essential. If you notice sparks, burning smells, or smoke coming from your dryer, turn it off immediately and avoid further use. If you experience electrical shocks when touching the dryer, stop using it and contact a professional. When your dryer won’t turn on despite troubleshooting, or if you find damaged wires or components, it’s best to leave repairs to experts. Attempting to fix complex electrical problems without proper knowledge can lead to injury or fire hazards. Always prioritize safety—if you’re unsure about the problem or feel uncomfortable working with electrical parts, don’t hesitate to call a licensed technician. They have the skills and tools to diagnose and fix issues safely.
Frequently Asked Questions
How Do I Reset a Tripped Circuit Breaker for My Dryer?
When your dryer isn’t heating, resetting the circuit breaker is a good first step. You should locate your home’s electrical panel and find the breaker labeled for your dryer. Turn it off completely, wait a few seconds, then flip it back on. This action resets the circuit. Make sure the breaker stays in the “on” position. If it trips again, there might be an underlying electrical issue that needs professional attention.
What Are Signs That the Heating Element Needs Replacement?
You might notice your dryer isn’t heating properly, which could mean the heating element needs replacing. Signs include clothes taking longer to dry, or still being damp after a full cycle. You might also hear a clicking sound from the element area or see visible damage like a broken coil or burn marks. If these symptoms appear, it’s time to test or replace the heating element to restore proper dryer function.
Can a Clogged Vent Cause the Dryer Not to Heat Properly?
A clogged vent is like a traffic jam for your dryer’s hot air, obstructing proper airflow. When vents are blocked, the dryer’s sensor detects the reduced airflow and may shut down the heating process to prevent overheating. So yes, a clogged vent can cause your dryer not to heat properly. Regularly cleaning the vent ensures warm air flows freely, helping your dryer work efficiently and safely.
How Often Should I Replace the Thermal Fuse?
You should replace the thermal fuse if it blows, which usually indicates an overheat or venting issue. There’s no set schedule for replacement, but if your dryer stops heating and you’ve checked the vent and lint filter, inspect the fuse. If it’s blown, replace it promptly to restore proper function. Regular maintenance, like cleaning vents and lint screens, can prevent fuse blowouts and keep your dryer running smoothly.
Are There Safety Precautions Before Inspecting Internal Dryer Components?
Before inspecting your dryer’s internal components, you should prioritize safety precautions. Unplug the dryer to prevent electrical shocks and wait a few minutes to let any residual power drain. Wear insulated gloves and safety glasses to protect yourself from sharp edges and hot parts. Make certain the dryer is completely cool before opening it up. Taking these steps helps keep you safe while diagnosing or repairing your dryer.
Conclusion
Remember, your dryer’s warmth is like a heartbeat—if it stops, your laundry life stalls. By checking the power, heating element, and vents, you’re tending to its essential signs. When things still feel cold inside, don’t hesitate to call a professional—sometimes, even the brightest flame needs expert care to reignite. Keep nurturing your appliance’s spirit, and it’ll keep your laundry cycle running smoothly, symbolizing comfort and reliability in your home.